

How to Choose Entry Door Trim That Lasts
For long-lasting entry door trim, choose an exterior-rated material that suits your climate and matches your home’s style. Cellular PVC resists moisture and rot, while treated wood offers a traditional look but needs more upkeep. Before buying, measure the opening and check that the trim leaves room for the door to swing freely.
Trim frames the front door and gives the entry a finished look. It also covers the joint between the door frame and the wall. In Florida, good looks are only part of the job: proper flashing and sealing help keep rain out. If you have a hurricane-rated door, make sure the trim installation does not alter its approved assembly.
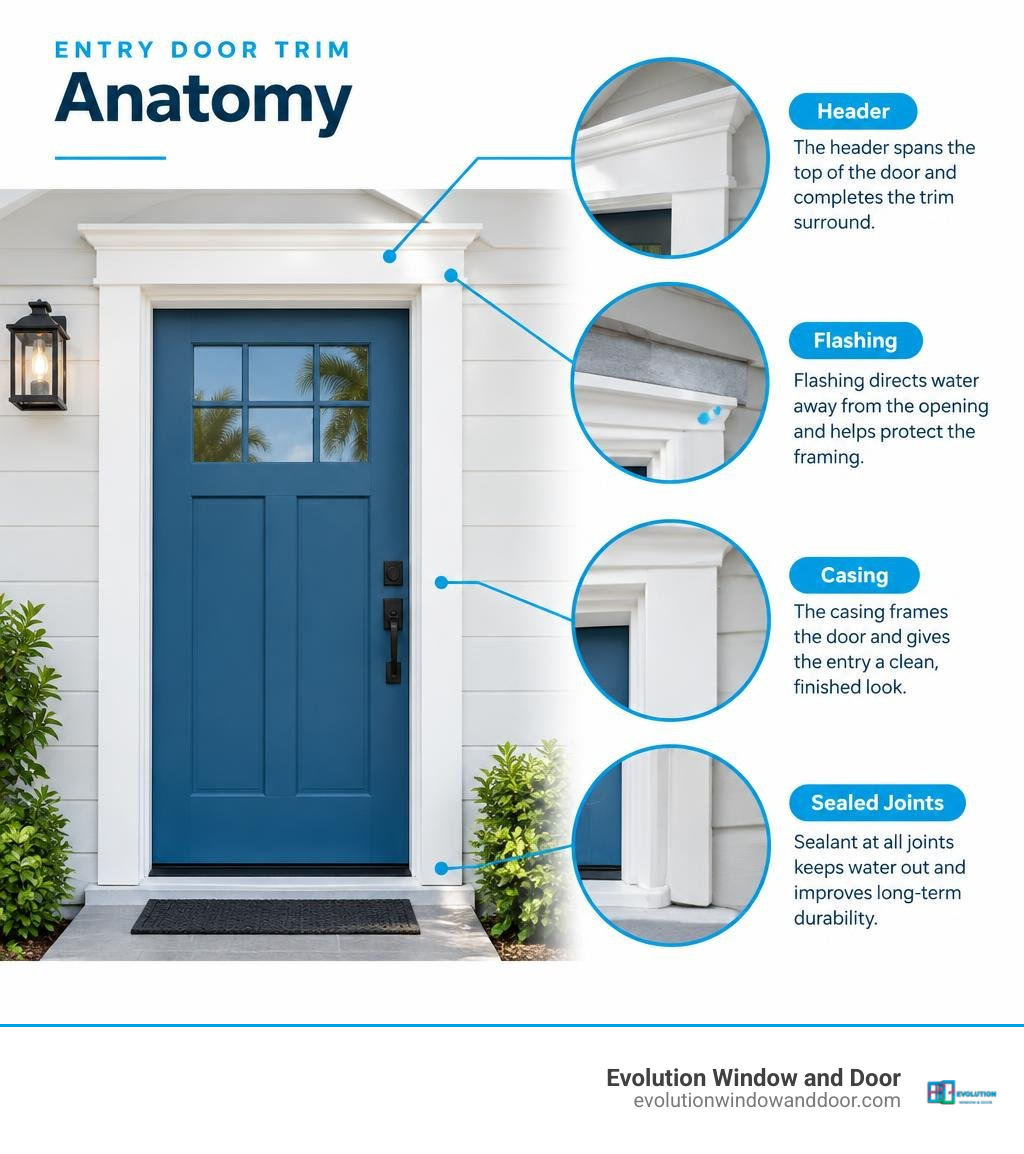
Anatomy and Key Materials of Modern Entry Door Trim
Your entryway is the visual anchor of your home’s exterior façade. It creates that crucial first impression for guests while performing the hard structural work of bridging the gap between your finished door jamb and the exterior cladding.
When you break down an entryway surround, you find a collection of specialized components working together to direct water away from the framing while providing pleasing architectural balance. Understanding these components helps you design an entrance that looks upscale and performs reliably in demanding subtropical climates.
Architectural Components: Pilasters, Pediments, Crossheads, and Plinth Blocks
A standard casing setup consists of vertical side jambs and a horizontal top header. Moving beyond the basics introduces specialized architectural elements that turn a flat opening into a stately entrance:
- Crossheads (Headers): The horizontal decorative molding spanning the top of the door frame. A crosshead projects outward from the wall, visually grounding the opening and establishing an architectural cap.
- Pediments: Sitting atop the crosshead, pediments come in triangular, peaked, broken, or arched silhouettes. Often featuring center elements like a sunburst or decorative keystone, pediments add height and classic elegance.
- Pilasters: Decorative vertical uprights that mimic classical columns. They can be flat, fluted, or paneled, flanking the left and right sides of your door slab to create grand visual presence.
- Plinth Blocks: Substantial rectangular blocks installed at the base of the pilasters where the casing meets the ground or porch slab. They anchor the vertical trim visually and protect detailed molding profiles from ground moisture contact.
Exploring curated exterior door trim ideas reveals how these classic profiles blend with modern accents like copper flashing to create unforgettable curb appeal.
Material Breakdown: PVC, Polyurethane, Treated Wood, and Fiber Cement
Selecting the right material determines how frequently you will need to repaint, scrape, or repair your trim. In hot, humid climates like Southwest Florida—from Sarasota and Punta Gorda down to Cape Coral, Fort Myers, and Naples—material stability under relentless sun and driving tropical rain is vital.
| Material | Durability Rating | Maintenance Needs | Moisture & Insect Resistance | Cost Tier |
|---|---|---|---|---|
| Cellular PVC | Exceptional (Will not rot or split) | Very Low (Occasional wash, holds paint well) | Impervious to water and wood-boring insects | Moderate to High |
| High-Density Polyurethane | Superior (Extremely stable) | Very Low (Resists cracking and peeling) | Impervious to water and rot | Moderate |
| Treated Wood (e.g., Belco XT) | High (When sealed properly) | Moderate (Requires routine paint/sealant upkeep) | High resistance due to chemical treatment | Low to Moderate |
| Fiber Cement | Superior (Class A fire rated) | Low (Paint adheres well, resists denting) | Excellent rot and termite resistance | Moderate |
| Natural Softwood (Cedar/Pine) | Moderate (Prone to soft spots) | High (Requires frequent sealing) | Moderate naturally, prone to rot if unsealed | Low to Moderate |
- Cellular PVC: A solid synthetic material with the workability of wood. It can be cut, routed, and nailed with standard woodworking tools. PVC absorbs zero moisture, making it ideal for coastal regions like Sanibel and Pine Island where salt air and driving humidity degrade organic lumber.
- High-Density Polyurethane: Molded from high-density foam, polyurethane allows for intricate, deep-relief millwork profiles like keystones, pediments, and dentil molding without the weight or rotting risks of plaster and carved timber.
- Pre-Primed Treated Wood: Engineered, treated exterior wood (such as Belco XT) resists rot, warping, and insect intrusion through advanced preservative treatments. It gives traditional carpenters the feel of real timber while offering far greater dimensional stability than raw pine.
- Fiber Cement: Made from a slurry of cement, sand, and cellulose fibers, this composite delivers non-combustible durability and resistance to rot. It is heavier to handle and requires diamond-tipped cutting blades, but it holds exterior paint finishes exceptionally well.
Before finalizing your materials, review our guide to comparing exterior door options to ensure your trim material aligns with the thermal and structural performance of your door slab.
Selecting the Right Trim Style for Your Architecture and Door Dimensions
Casing profiles must match your home’s overarching architectural language. An ornate, multi-layered pediment looks out of place on a sleek, minimalist home, while narrow, plain casing can make an expansive entry door appear undersized and unfinished.
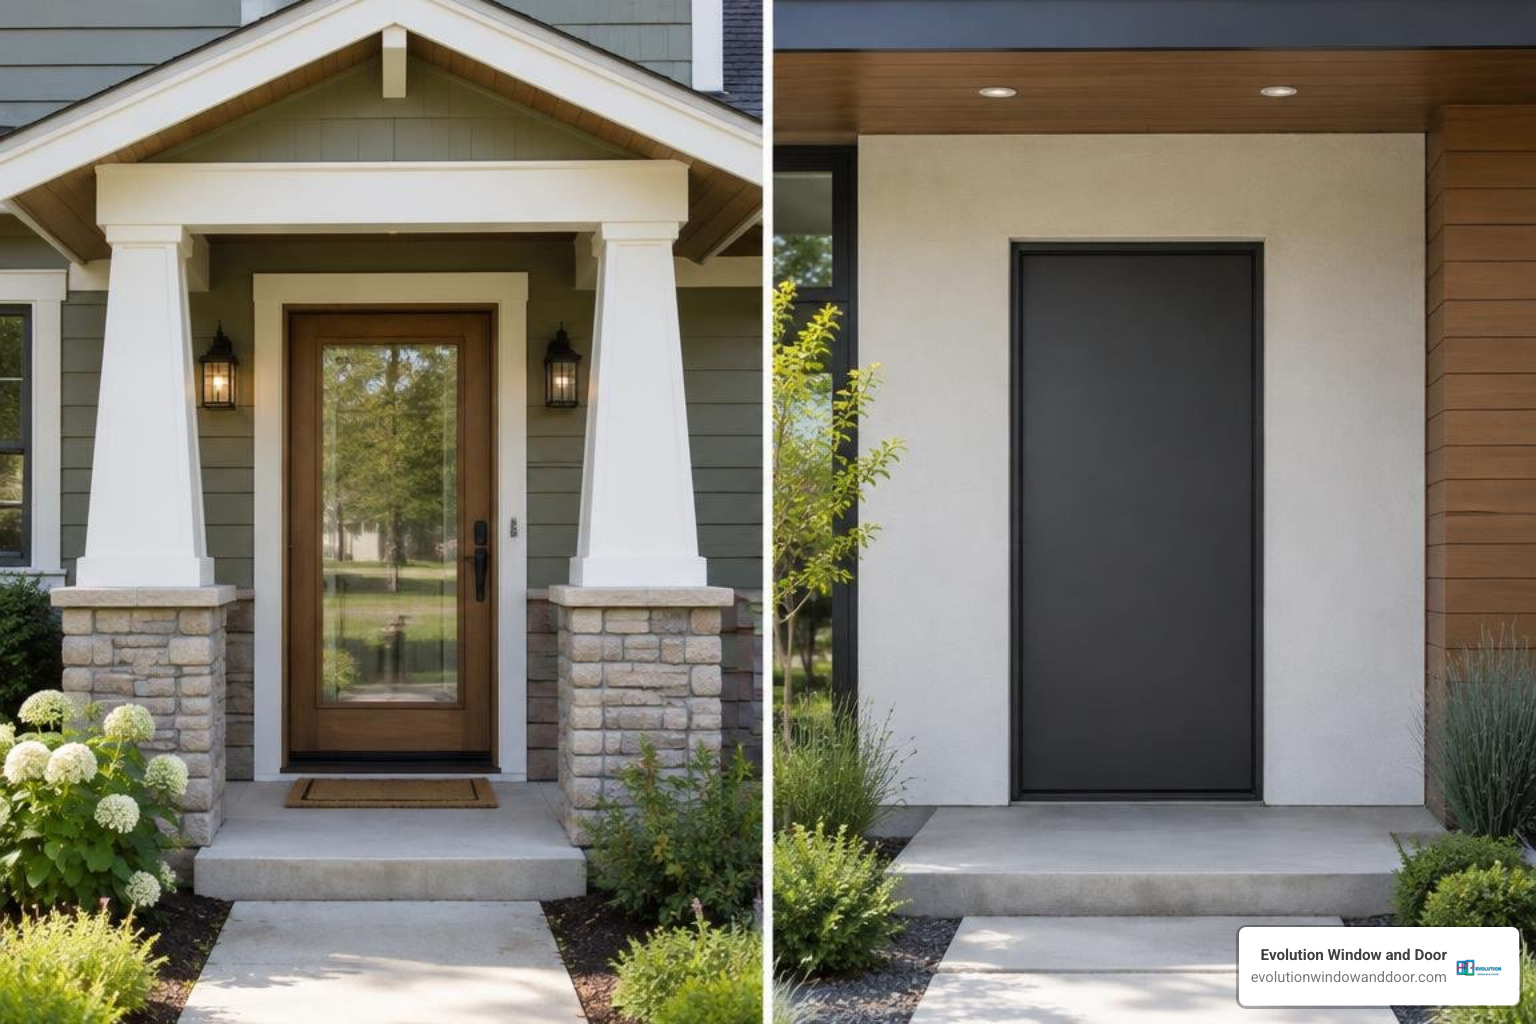
Matching Historic, Craftsman, and Contemporary Façades
Achieving balance requires choosing trim profiles that reflect your home’s architectural heritage:
- Colonial and Georgian: These homes benefit from formal, symmetrical surrounds. Fluted pilasters, detailed crossheads, and decorative keystones add the required architectural depth and dignity.
- Craftsman and Bungalow: Craftsman architecture values unadorned, structural geometry. Flat, broad casing with an extended top header and understated crown molding complements craftsman exterior door profiles perfectly.
- Contemporary and Modern: Modern aesthetics favor clean lines, square profiles, and minimal reveals. Shadowline casings or crisp 1×4 flat PVC trim provide clean framing when framing black front entry doors against stucco or modern siding.
Sizing Trim for Standard and Oversized Entryways
Scale and proportion dictate whether your entryway looks grand or cramped. A standard 36-inch wide front door generally pairs best with casing widths ranging between 3.5 inches and 4.5 inches.
When you expand to larger portals, such as wider 42-inch entry doors or grand 48-inch grand entryways, standard 2.5-inch casing appears spindly. Wider entryways demand 5.5-inch to 7.25-inch pilasters paired with an oversized crosshead to maintain visual harmony.
Reviewing standard door dimension sizing ensures your door rough opening accounts for both the door frame and the full exterior profile of your chosen casing.
Precision Installation and Weatherproofing Techniques
A clean, professional installation goes far beyond straight cuts and flush joints. In coastal and storm-prone areas like Port Charlotte and Bonita Springs, proper moisture flashing and fastener selection protect your structural wall framing from hidden rot.
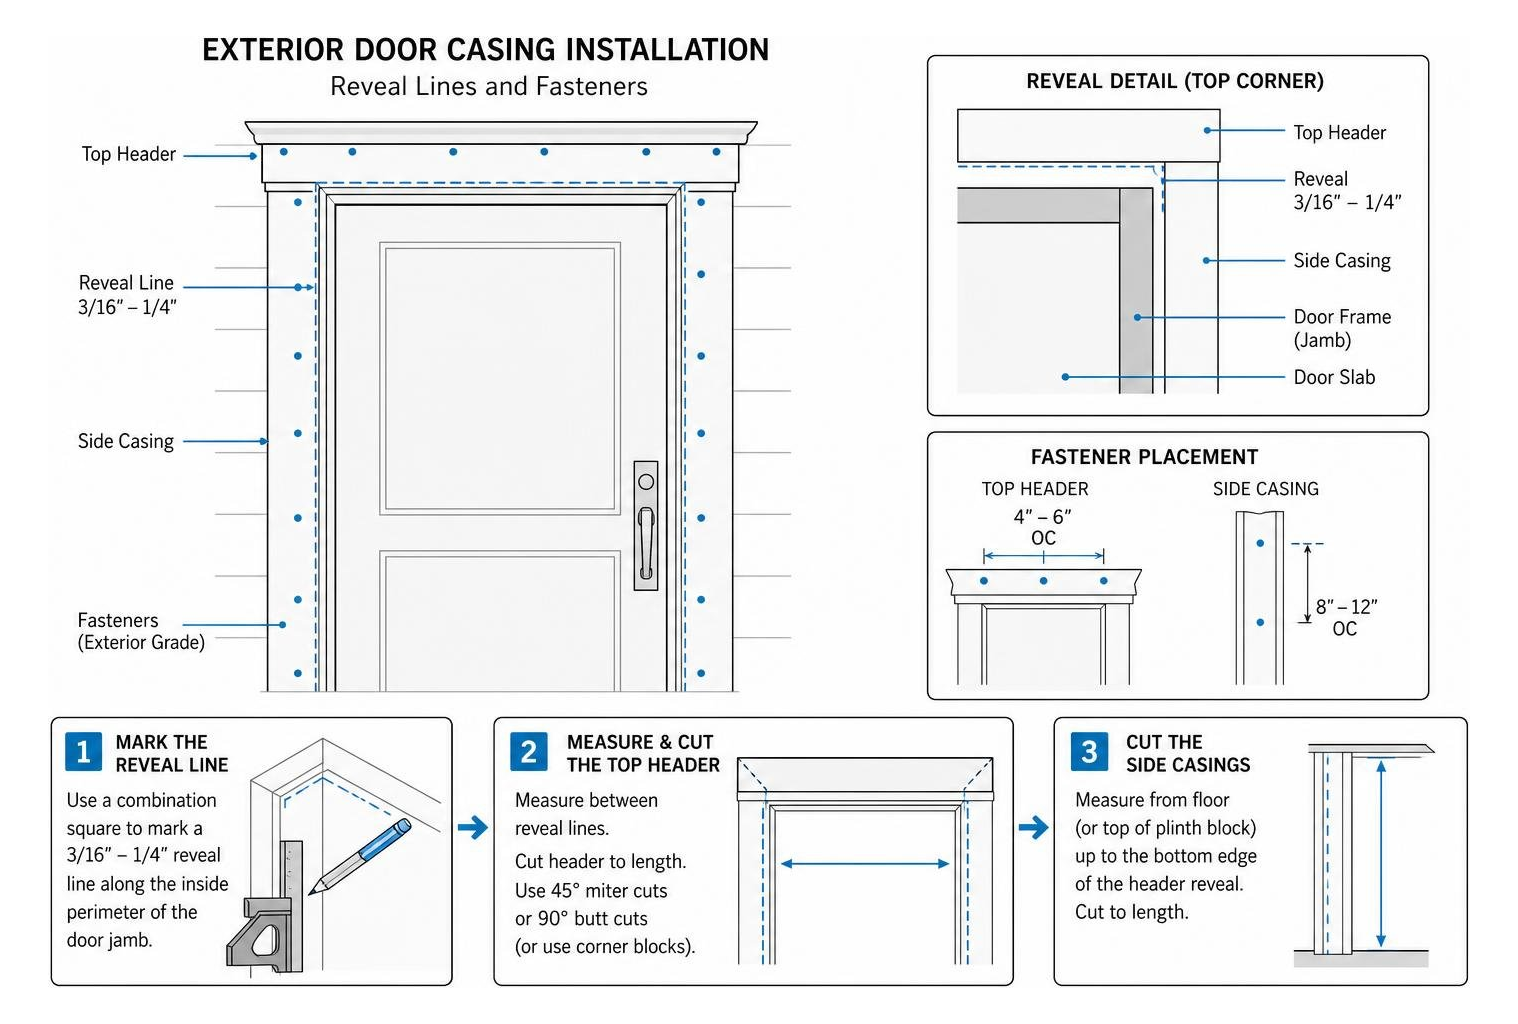
Step-by-Step Guide to Installing Entry Door Trim
- Mark the Reveal Line: Use a combination square to pencil a consistent 3/16-inch or 1/4-inch reveal line along the inside perimeter of the door jamb. This reveals a crisp edge of the door frame and prevents the trim from interfering with hinge swings or weatherstripping.
- Measure and Cut the Top Header: Measure the distance between your vertical reveal marks at the top corners. If using mitered joints, cut your 45-degree angles on a compound miter saw. If using butt joints or decorative corner blocks, cut cleanly at 90 degrees.
- Cut the Side Casings: Measure from the subfloor (or top of the plinth block) up to the bottom edge of the installed header reveal. Account for any minor floor slope to ensure tight bottom seating.
- Dry-Fit the Entire Assembly: Hold all pieces in place using painter’s tape to verify that joints fit tight and reveals remain uniform across the entire perimeter.
- Fasten Securely: Apply an exterior-grade polyurethane construction adhesive to the back of the trim. Secure the trim to the structural framing studs using 2.5-inch 15-gauge or 16-gauge stainless steel finish nails. Stainless fasteners prevent dark rust streaks under exterior paint.
- Shim for Coplanar Alignment: Use rot-proof composite shims behind the casing if your wall sheathing is slightly out of plane with the door jamb.
If you prefer to bypass the intricacies of mitering and heavy structural fastening, our team provides turn-key professional door installation services engineered to meet strict building codes across Southwest Florida.
Critical Weatherproofing: Flashing, Caulking, and Rot Prevention
Water management is the single most critical factor in exterior trim longevity. Even rot-proof synthetic trim will funnel water into your wall studs if the surrounding water barrier is compromised:
- Drip Cap Z-Flashing: Always install corrosion-resistant metal or rigid PVC drip cap flashing above the top horizontal header or crosshead. The flashing must slip under the weather-resistive barrier (house wrap) and extend over the face of the trim to direct runoff away from the jamb.
- High-Performance Elastomeric Sealants: Seal the outer perimeter where the trim meets your home’s siding or stucco with a premium, paintable elastomeric or polyurethane sealant. Avoid cheap painter’s caulk, which cracks under thermal expansion.
- Expansion Gaps for Synthetics: Cellular PVC and polyurethane expand and contract along their length with temperature shifts. Leave a 1/8-inch expansion gap at joint ends when installing in high temperatures, and bridge the seams with specialized PVC adhesives or flexible sealants.
- End-Grain Sealing: If installing treated or natural wood trim, coat every freshly cut end grain with exterior primer or wood preservative before fastening. Unsealed bottom cuts act like sponges, drawing groundwater directly into the wood fiber.
Pairing sealed trim surrounds with durable weather-resistant metal exterior doors provides maximum security against harsh subtropical elements.
Enhancing Your Entryway with Color, Lighting, and Hardware Synergy
An entrance achieves its full potential when the casing, door color, lighting fixtures, and architectural hardware work together to establish an inviting atmosphere.
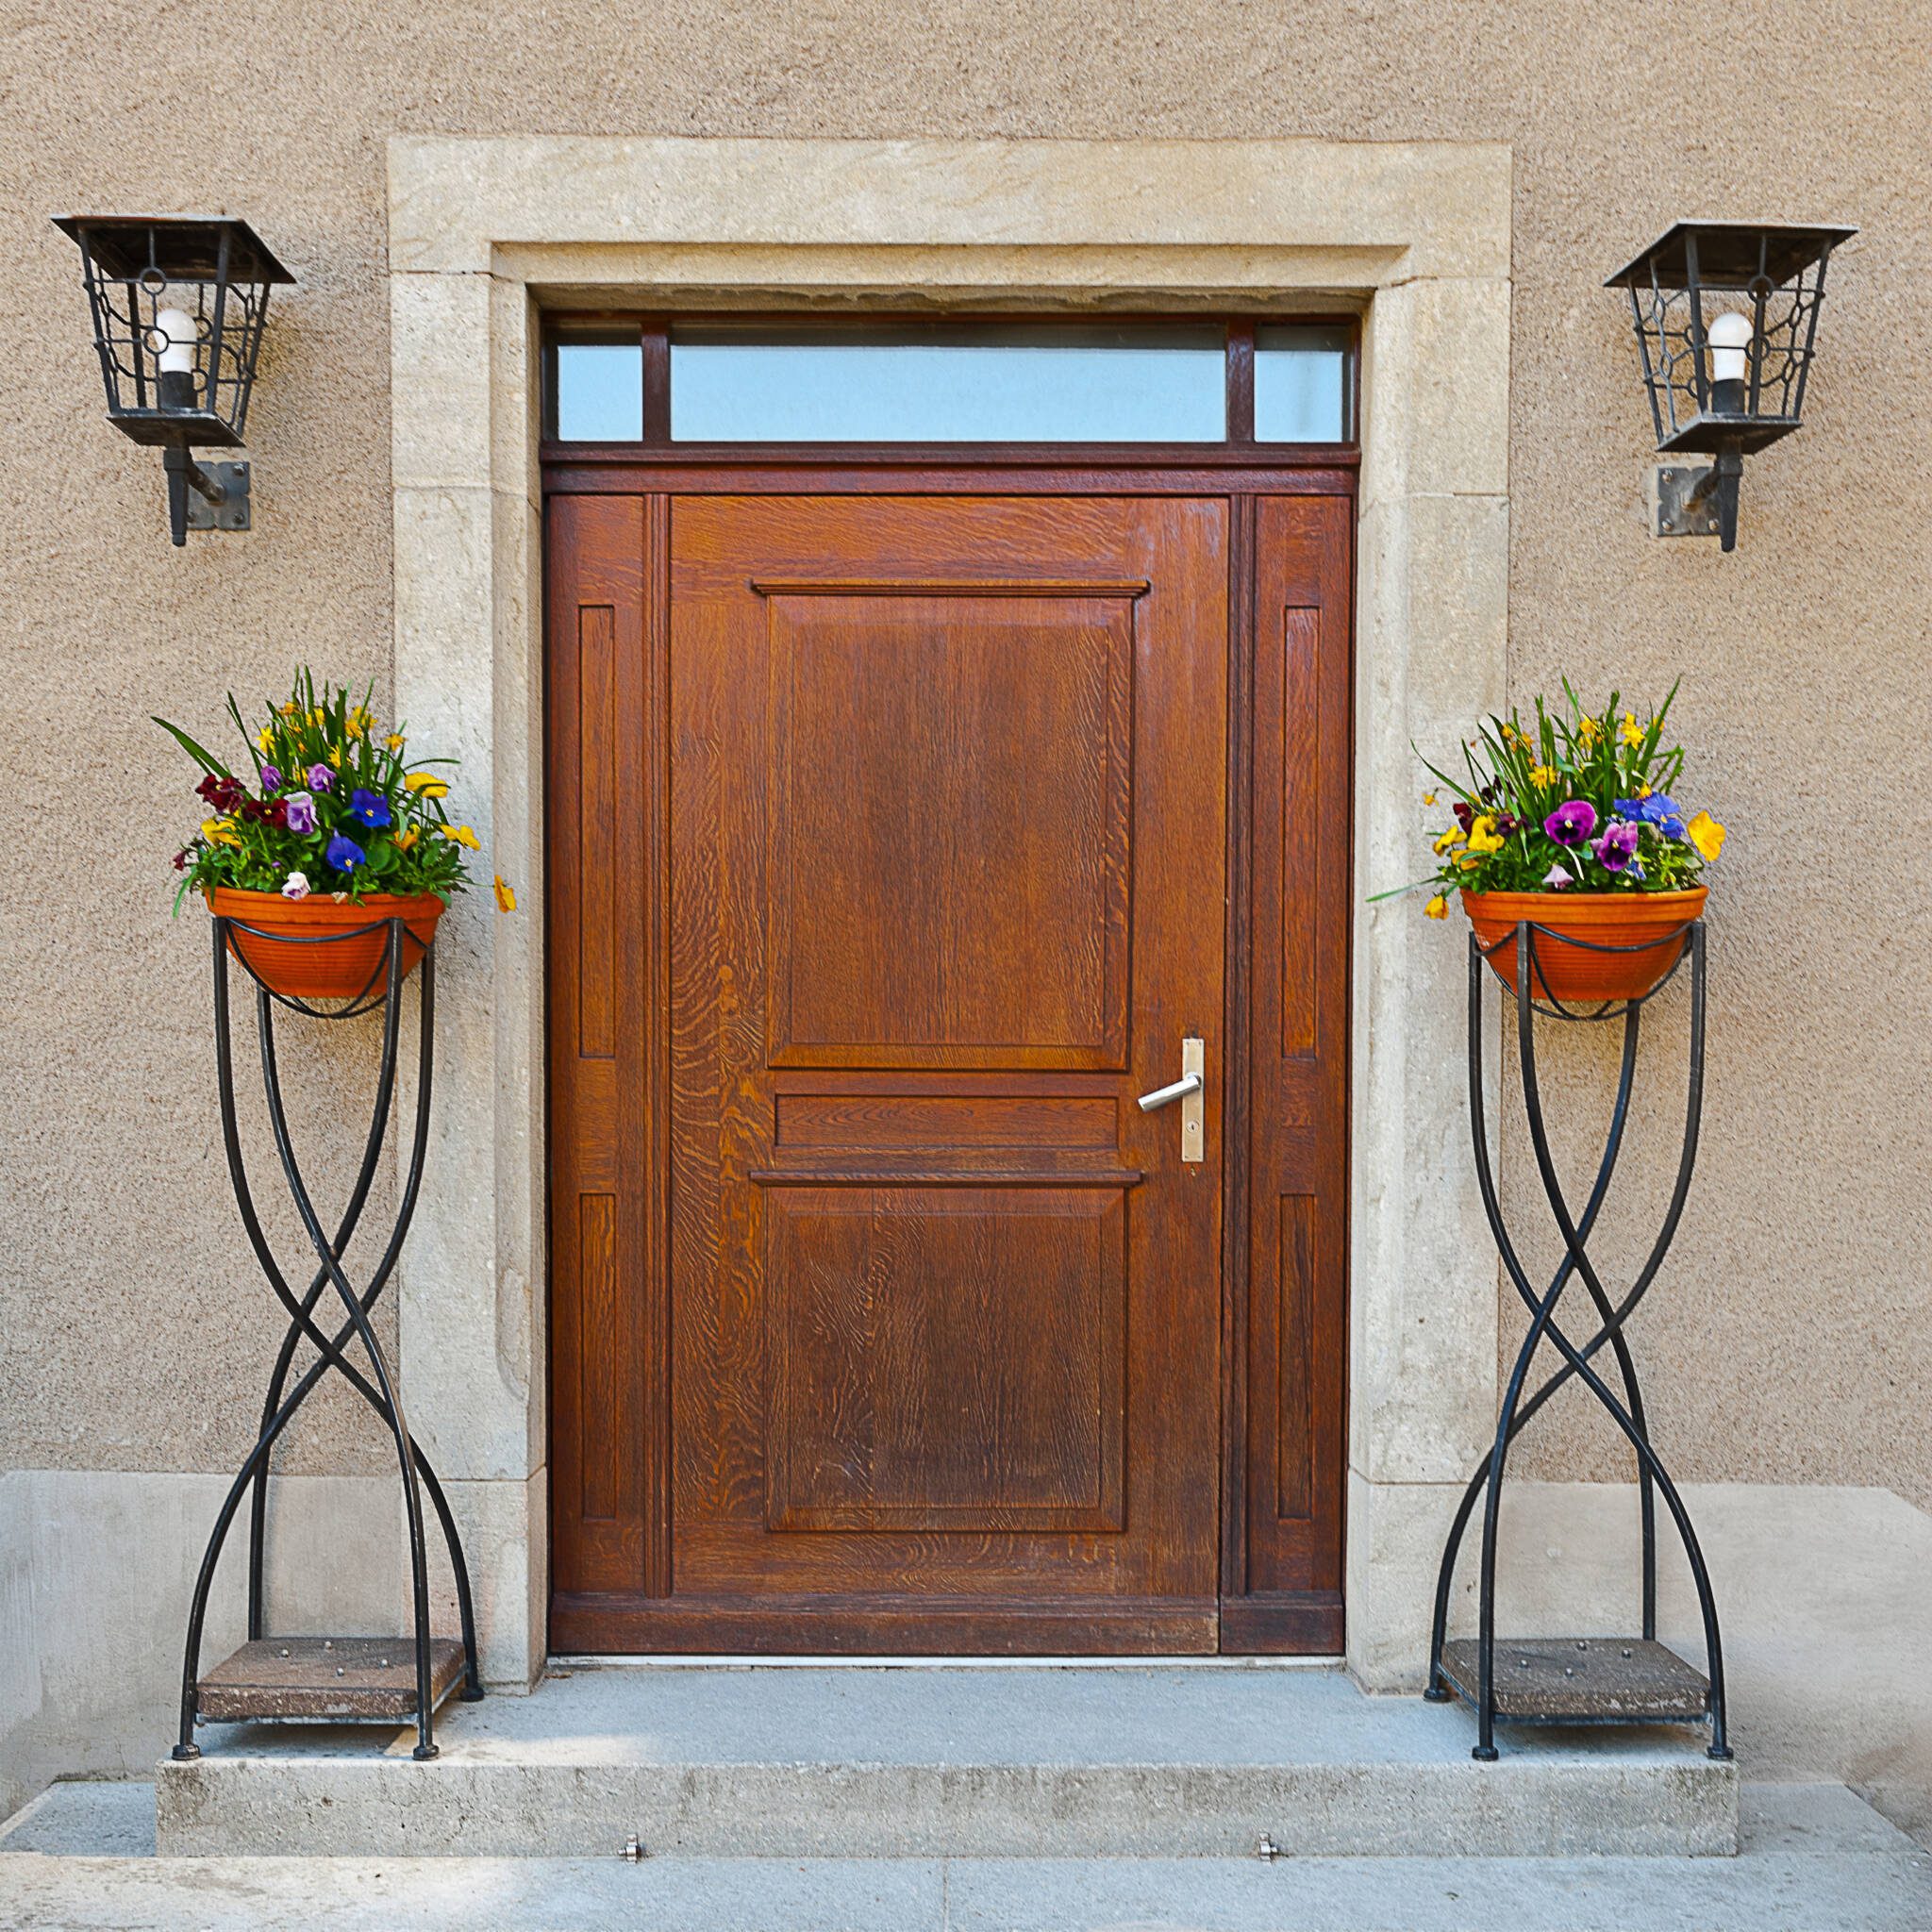
Designing with High-Contrast Colors and Architectural Lighting
- High-Contrast Palettes: Painting your door casing in a brilliant white while finishing the door slab in deep charcoal, navy, or jet black creates crisp visual definition. Conversely, pairing clean white pilasters with vibrant, coastal-inspired door tones—like light sage green or rich papaya—adds warmth and individuality.
- Architectural Lighting Placement: Exterior sconces mounted on either side of the pilasters should sit roughly at eye level (60 to 66 inches from the porch floor). If your entryway features a pediment or decorative crosshead, consider overhead soffit downlighting to highlight the deep shadowlines of the millwork at night.
Explore further ideas for creating welcoming entryway styling to ensure interior and exterior spaces transition smoothly.
Coordinating Premium Hardware and Deadbolts
Exterior hardware serves as the jewelry of your front entrance. High-end casing demands substantial, finely finished locksets that can withstand coastal environments without pitting or corroding:
- Solid Forged Brass & PVD Finishes: For enduring resistance against salty air, opt for solid forged brass equipped with Physical Vapor Deposition (PVD) finishes. Options like the Gramercy handleset with knurled levers provide durable, corrosion-resistant beauty that accommodates standard 1.75-inch thick exterior doors or thicker entries via conversion kits.
- Security Certifications: Look for hardware certified with an ANSI/BHMA Grade AAA rating for residential security, durability, and mechanical performance. Systems like Greenwich front entry handle sets blend clean trim profiles with adjustable backsets (2-3/8 inches to 2-3/4 inches) and universal handling for effortless integration.
- Smart Lock Integration: Pair your exterior decorative levers with sleek, modern electronic deadbolts to combine classic trim beauty with keyless convenience.
Browse our curated collection of exterior door hardware selection to find mechanisms engineered to match your casing style.
Maintaining Exterior Trim and Avoiding Costly Mistakes
Preserving your exterior door casing involves avoiding common construction errors during installation and maintaining a simple, seasonal inspection routine.
Common DIY Mistakes to Avoid During Selection and Installation
- Omitting the Reveal: Nailing trim completely flush with the inside edge of the door frame often binds the door hinges and creates unsightly, irregular paint lines.
- Resting Trim Directly on Concrete: Installing pilasters or plinth blocks flat against a porch concrete slab allows standing rainwater to seep into the fasteners and bottom edges. Always leave a 1/4-inch gap between the bottom of the casing and hard paving, sealed with an elastomeric bead or isolated with a composite shoe.
- Using Interior-Grade Fasteners: Standard electro-galvanized brad nails quickly corrode when exposed to outdoor humidity, staining your paint with rust streaks and compromising holding power. Always use stainless steel fasteners.
- Over-Tightening Without Movement Allowances: Fastening cellular PVC too rigidly without leaving subtle expansion room at header joints can cause boards to buckle during hot summer afternoons.
Maintenance Best Practices for Long-Lasting Entry Door Trim
- Bi-Annual Caulk Inspection: Check the perimeter sealant between the trim and wall cladding every spring and fall. Scrape out any cracked or separated sealant and reseal immediately to prevent water intrusion.
- Gentle Washing: Clean synthetic and painted wood trim twice a year using a soft sponge, warm water, and mild detergent. Avoid high-pressure washers, which can drive moisture past weatherstripping and strip factory coatings.
- Prompt Paint Touch-Ups: When using natural or treated wood, inspect corners and joints for hairline cracks in the paint film. Sand lightly, apply an exterior primer, and recoat with high-quality 100% acrylic exterior paint to keep water from reaching the wood grain.
If recurring rot has damaged your structural framing or door jamb beyond simple repairs, explore comprehensive entry door replacement options designed to protect your home for decades.
Frequently Asked Questions About Entry Door Trim
What is the most durable material for exterior entry door trim?
Cellular PVC and high-density polyurethane are the most durable materials for exterior door trim. Unlike natural wood, these synthetic materials absorb zero moisture, will never rot, split, or swell, and are completely impervious to termites and other wood-boring pests. When properly fastened and finished with high-quality acrylic paint, synthetic casings can easily last the lifetime of the home with minimal maintenance.
Can I install entry door trim myself or should I hire a professional?
Homeowners with basic carpentry experience, a miter saw, a level, and a finish nailer can successfully install standard pre-assembled trim kits or basic flat casings. However, if your installation requires custom jamb extensions, stucco cutting, integration with hurricane-rated impact assemblies, or complex structural flashing, hiring a licensed professional ensures full weatherproofing and building code compliance.
How do I choose between pre-assembled trim kits and custom millwork?
Standard pre-assembled door trim kits are cost-effective, straightforward to source, and designed to fit common opening widths quickly. Custom millwork is the better choice when your entryway features non-standard heights, oversized custom doors (such as 42-inch or 48-inch widths), arched openings, or unique historic architectural profiles that standard off-the-shelf kits cannot replicate.
Conclusion
Upgrading your entryway with high-performance casing, pilasters, and headers bridges the gap between functional structural weatherproofing and elevated home design. By choosing moisture-resistant materials like cellular PVC, maintaining correct reveals, and installing proper drip flashing, you protect your home against the elements while creating a striking focal point.
At Evolution Window and Door, we specialize in helping homeowners across Southwest Florida transform their entryways with precision installations, hurricane-rated security, and timeless architectural details. Contact us today to explore our expert exterior door and window solutions and frame your dream entrance with total confidence.

