

How to Add an Exterior Door That Fits and Seals
To add an exterior door, first check for wiring or plumbing and confirm whether the wall needs structural support. Frame a rough opening to fit the specific prehung unit, then repair and level the sill. Install a draining sill pan and flashing before setting the door. Shim the jambs plumb, fasten them into the framing, and check that the door opens, latches, and seals evenly. Finish with low-expansion foam around the frame.
Cutting a new opening is not the same as replacing a door. If you need to alter a load-bearing wall, cut masonry, or meet Florida impact-door requirements, check local permit rules and consider hiring a qualified installer before you start.
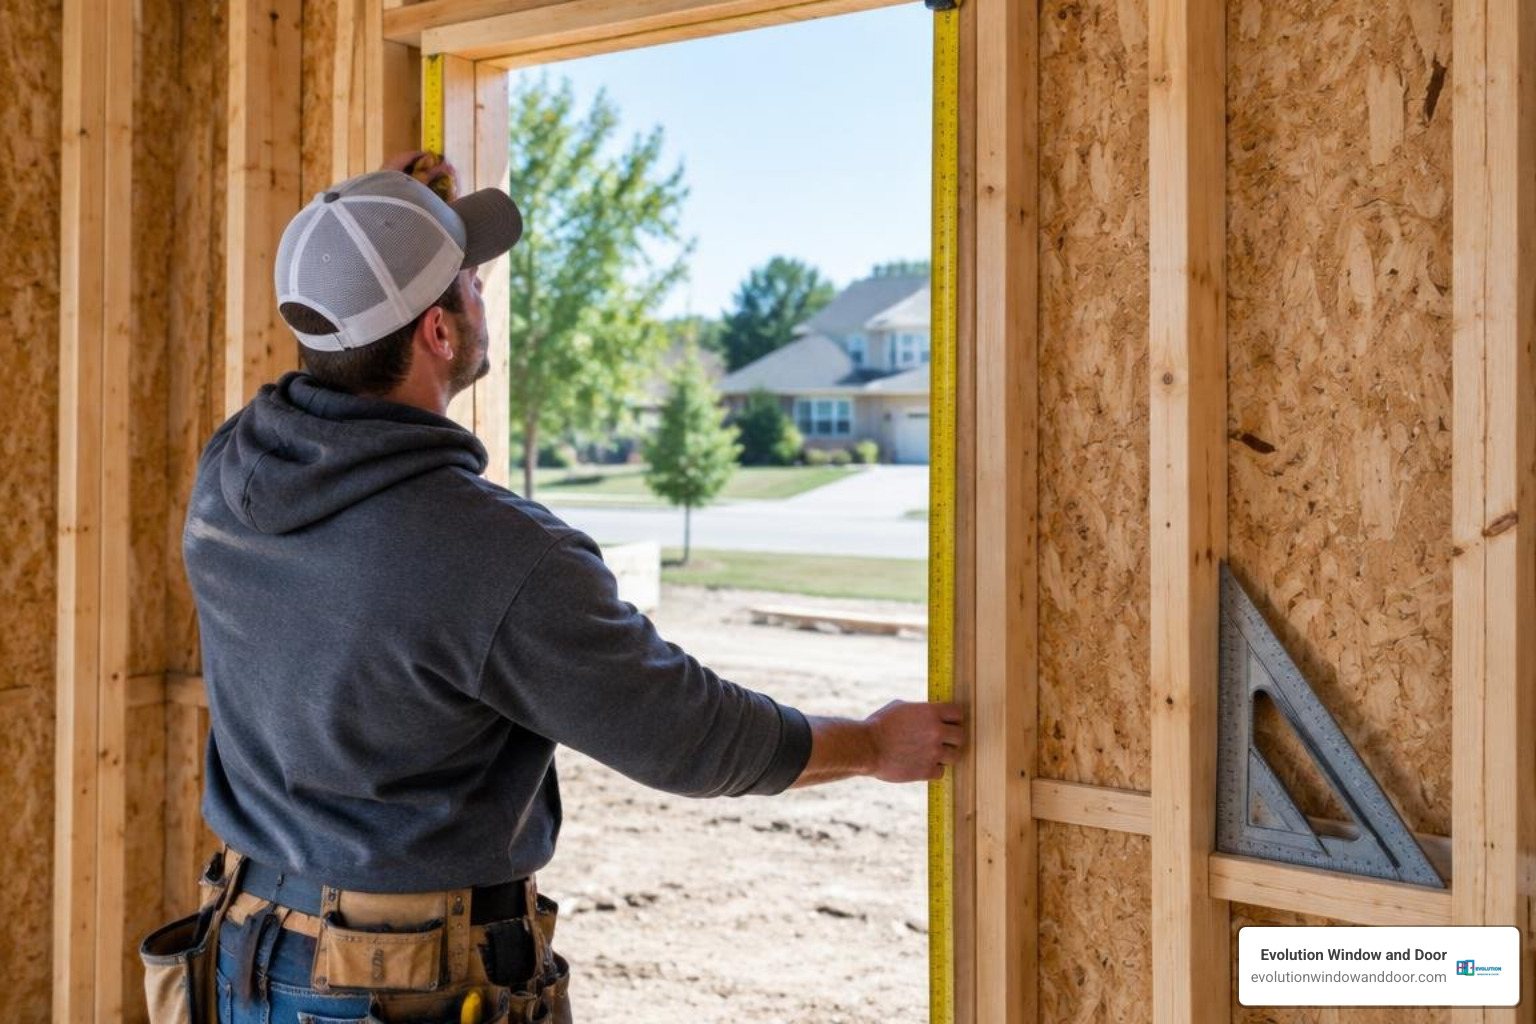
Measuring and Preparing the Rough Opening
A trouble-free door installation begins with precise measurements. If the rough opening (RO) is cut too small, the prehung unit will not fit; if it is too large, securing the frame and establishing an airtight seal becomes difficult.
To determine the required rough opening size, calculate the dimensions using the manufacturer’s specification sheet or standard framing guidelines. As a general rule, the rough opening width should be 2 to 2-1/2 inches wider than the nominal door slab width, and the rough opening height should be 2 to 2-1/2 inches taller than the slab height. This extra space accommodates the thickness of the door jambs (typically 3/4 inch per side), the sill threshold, and a 1/2-inch margin on all sides for shimming and insulation.
When planning your entryway layout, finding the perfect fit for standard exterior door sizes ensures your rough framing matches your architectural goals.
| Door Slab Size (Nominal) | Standard Frame Outer Dimensions | Recommended Rough Opening (RO) | Common Wall Stud Configuration |
|---|---|---|---|
| 30″ x 80″ (2’6″ x 6’8″) | 31-1/2″ x 81-3/4″ | 32″–32-1/2″ x 82″–82-1/2″ | 2×4 or 2×6 Wood Framing |
| 32″ x 80″ (2’8″ x 6’8″) | 33-1/2″ x 81-3/4″ | 34″–34-1/2″ x 82″–82-1/2″ | 2×4 or 2×6 Wood Framing |
| 36″ x 80″ (3’0″ x 6’8″) | 37-1/2″ x 81-3/4″ | 38″–38-1/2″ x 82″–82-1/2″ | 2×4 or 2×6 Wood Framing / Concrete Block |
| 42″ x 80″ (3’6″ x 6’8″) | 43-1/2″ x 81-3/4″ | 44″–44-1/2″ x 82″–82-1/2″ | 2×6 Framing / Reinforced Headers |
Before proceeding, confirm three critical geometric properties of the opening:
- Level: Place a 4-foot or 6-foot level across the subfloor sill. Any slope must be corrected with shims or leveling compound.
- Plumb: Check both the left and right trimmer (jack) studs with your level on the inside faces and edges.
- Square: Measure diagonally from the top left corner to the bottom right corner, and from the top right to the bottom left. If the two diagonal measurements differ by more than 1/8 to 1/4 inch, the opening is racked and must be adjusted before installing the frame.
Planning to Add an Exterior Door: Structural and Framing Requirements
When cutting into a solid exterior wall rather than swapping an existing unit, you are altering the structural load path of your home. In regions across Southwest Florida—from Cape Coral and Fort Myers down to Naples and Sanibel—nearly all exterior walls carry structural loads from roof trusses, ceiling joists, or upper stories.
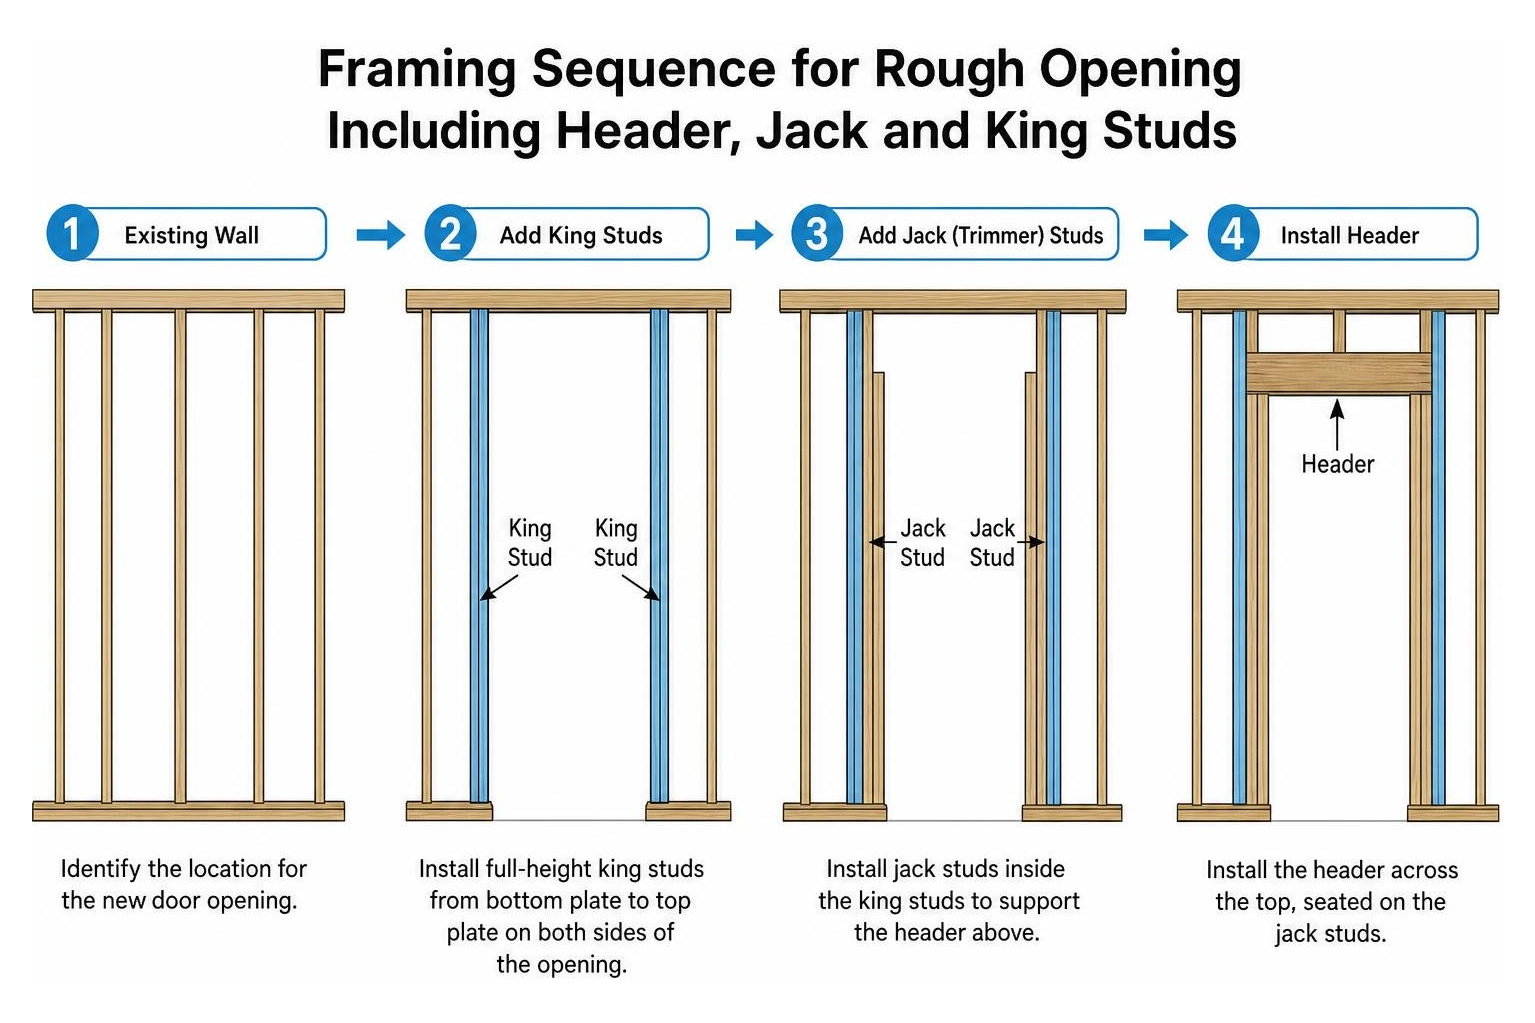
Before removing studs, you must construct temporary support walls (using 2×4 vertical studs spaced 16 inches on center between top and bottom 2×10 plates) roughly two feet inside the room to bear ceiling loads.
Once supported, frame the structural opening:
- King Studs: Full-height continuous studs running from the bottom plate to the top plate that reinforce the sides.
- Jack (Trimmer) Studs: Studs fastened inside the king studs that support the structural header above.
- Header: Sized to match local building codes. For openings up to 3 feet wide in single-story residential structures, a double 2×6 or double 2×8 header sandwiched with 1/2-inch structural plywood spacer provides the necessary load transfer.
- Cripple Studs: Short vertical framing members filling the gap between the top of the header and the top wall plate.
Inspect the exposed subfloor. If prior water infiltration has softened the floor joists or rim joist, cut out the damaged lumber and sister new structural framing members before setting the door.
Preparing Special Substrates: Wood Framing vs. Masonry and Stucco
Southwest Florida homes frequently feature concrete block (CBS) construction or stucco over wood framing, which requires distinct preparation methods:
- Concrete Masonry Units (CMU): Fastening directly into masonry requires pressure-treated 1x or 2x wood bucking secured with concrete anchors (such as Tapcon screws) embedded at least 1-1/4 inches into the block, sealed with polyurethane adhesive.
- Stucco Siding: Cut exterior stucco back approximately 2 inches wider than the rough opening using a circular saw with a diamond masonry blade. This leaves room to integrate self-adhered flashing directly against the underlying weather-resistive barrier (WRB).
- Concrete Slabs: When setting a door directly onto a slab foundation in Port Charlotte or Bonita Springs, apply a water-resistant membrane or liquid barrier across the concrete floor to prevent moisture from wicking into the framing and bottom trim.
Critical Flashing and Weatherproofing Before Installation
Water intrusion causes substantial structural rot and framing failure in residential construction. A standard exterior door must resist wind-driven rain and cyclic humidity without letting moisture penetrate the wall cavity.
Mastering how to install a solid-wood exterior door with This Old House techniques highlights the importance of keeping moisture entirely separated from structural framing members.
Building and Installing a Watertight Sill Pan
The sill pan serves as the primary defense against water intrusion beneath the threshold. Never set an exterior door frame directly onto bare subfloor wood or flat concrete.
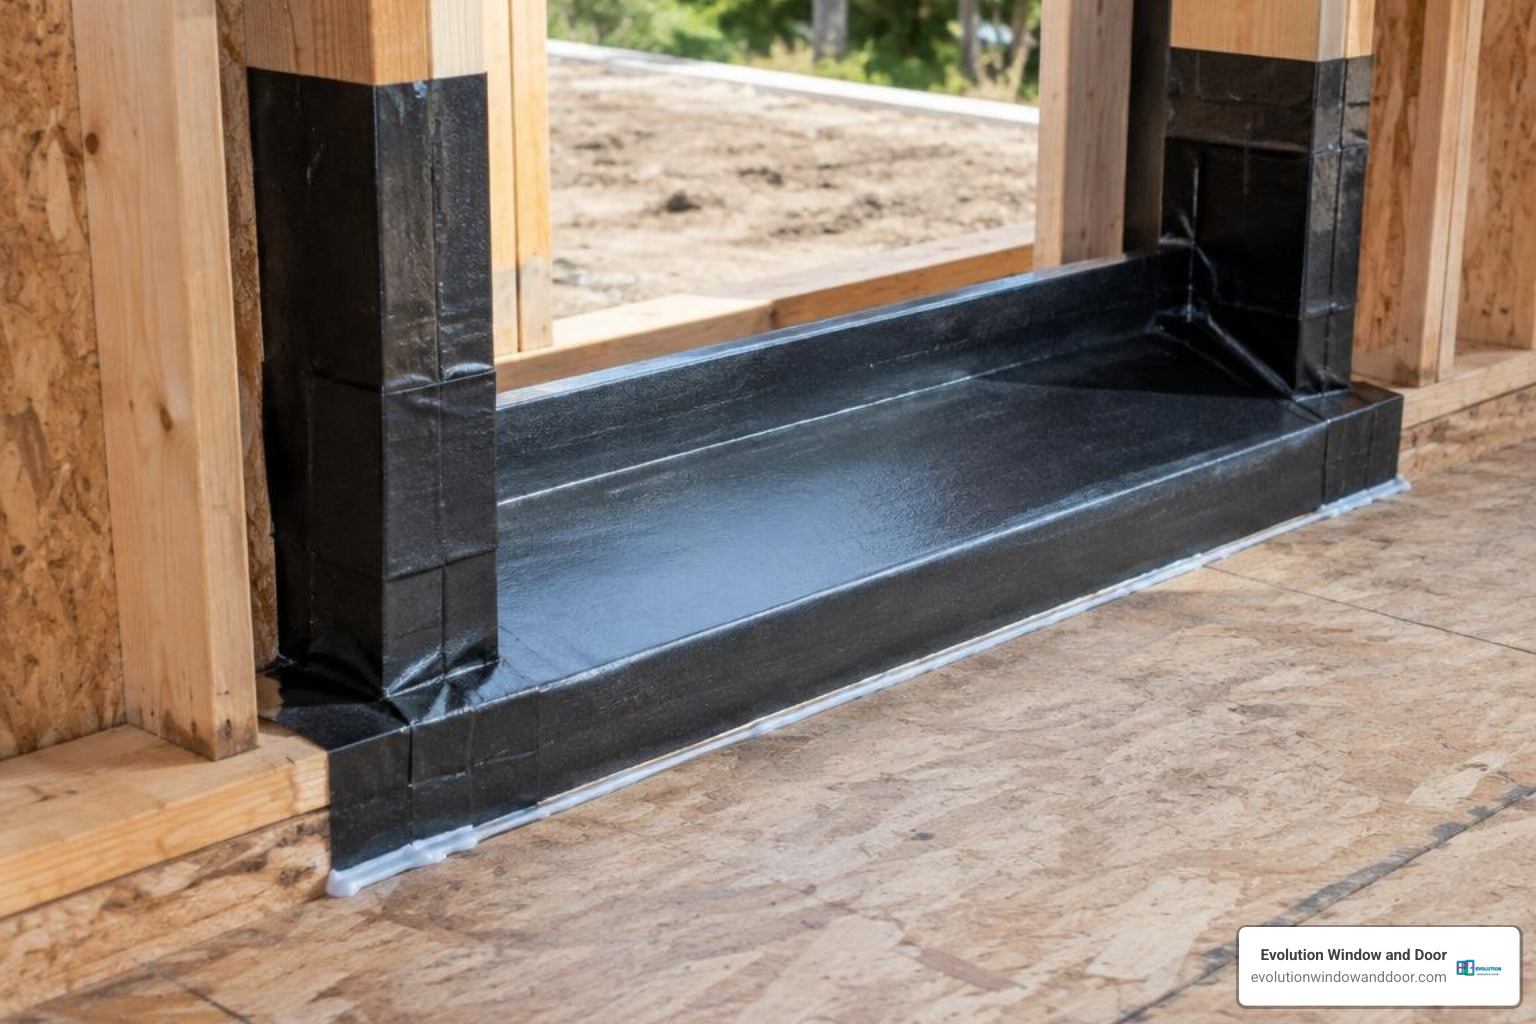
You can use a three-piece rigid PVC preformed sill pan with built-in end dams or build a custom site-fabricated pan using wide, flexible, self-adhering flashing tape:
- Bevel the Subfloor (Optional but recommended): Create a slight 1/8-inch downward slope toward the exterior using a wood shim or planer under the pan area.
- Apply Sealant: Lay three continuous 3/8-inch beads of premium polyurethane or elastomeric sealant across the rough subfloor.
- Seat the Pan: Press the sill pan firmly into the sealant beads. Ensure the interior lip (back dam) extends at least 1/2 inch upward to stop water from blowing backward into the home.
- End Dams: Confirm that the pan features upturned vertical end dams on both sides that extend 2 inches up the bottom of the trimmer studs.
Flashing Sequencing and House Wrap Integration
Proper flashing relies on the principle of shingle-lap sequencing: upper layers must always overlap lower layers so gravity guides water away from seams.
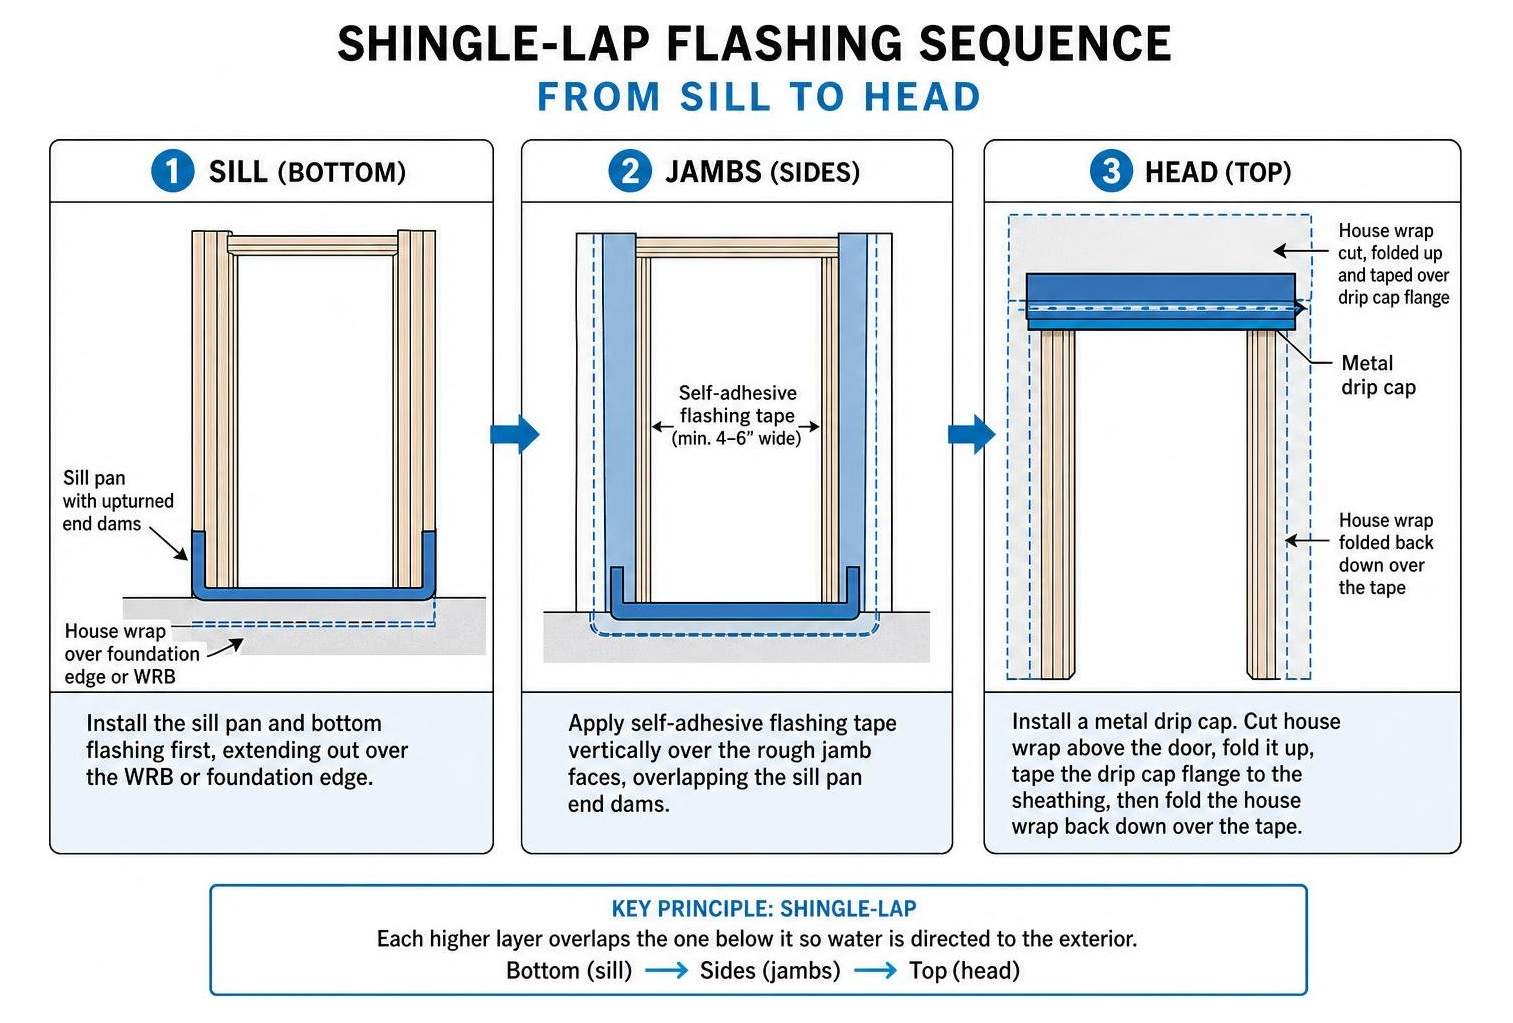
- Bottom (Sill): Apply the sill pan and bottom flashing first, extending out over the exterior water-resistive barrier or foundation edge.
- Sides (Jambs): Apply self-adhesive flashing tape (minimum 4 to 6 inches wide) vertically over the rough jamb faces, overlapping the upturned end dams of the sill pan.
- Top (Header): Install a rigid metal drip cap across the head casing or frame top. Cut the house wrap above the door and fold it up, secure the drip cap, tape its mounting flange directly to the wall sheathing with flashing tape, and fold the house wrap back down over the tape.
Step-by-Step Process to Add an Exterior Door Unit
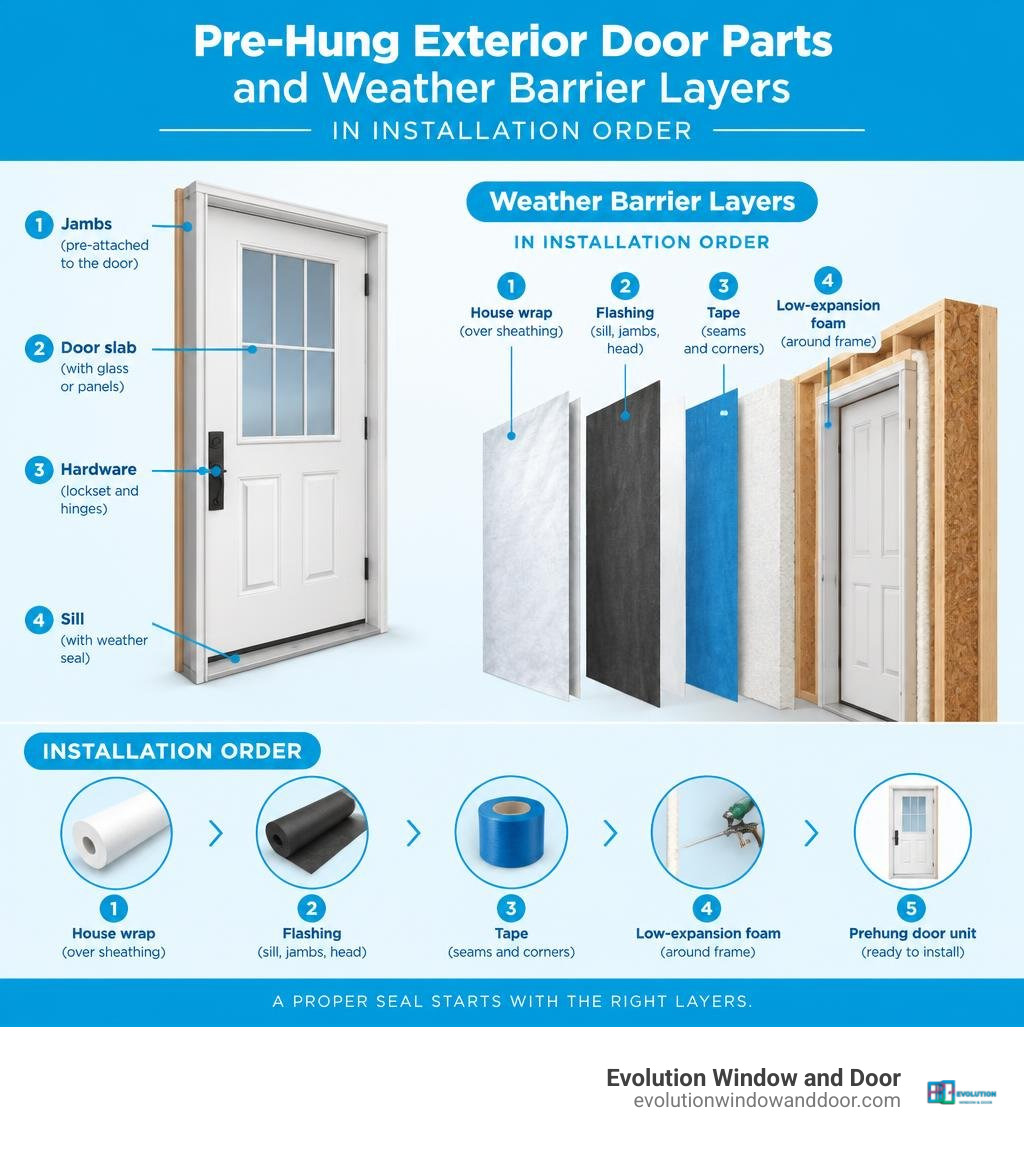
Once the rough opening is square, flashed, and fitted with a sill pan, you can install the prehung door assembly.
Following standard trade practices, such as the 6 steps to install an exterior door outlined by Fine Homebuilding, ensures clean operation and tight weather seals. If you prefer turnkey service, you can rely on our expert exterior door installation services to complete the project efficiently.
Setting, Shimming, and Plumbing the Prehung Frame
- Dry-Fit the Assembly: With a helper, lift the prehung unit into the opening from the exterior. Verify that the threshold sits flat on the sill pan and that clearances are uniform along the top and sides. Remove the door to make any framing adjustments.
- Apply Sill Sealant: Lay three thick beads of sealant on the sill pan floor where the threshold will rest. Leave a small 1/2-inch break at each end to allow incidental water drainage.
- Set the Frame: Tilt the door assembly back into the opening, pressing the threshold into the fresh sealant.
- Shim the Hinge Jamb First: Place pairs of tapered cedar or composite shims (inserted from opposite sides to create a flat, parallel surface) directly behind each hinge location between the jamb and the rough stud. Use a 6-foot level along the hinge jamb to confirm it is plumb in both directions (face and edge).
- Fasten the Hinge Side: Drive 3-inch exterior-grade wood screws through the hinge side jamb and shims into the structural jack stud. Remove one factory screw from the top and middle hinges and replace them with these 3-inch screws to anchor the unit deeply into the framing, preventing future door sag.
- Adjust the Strike Jamb: Close the door slab and inspect the reveal—the gap between the door edge and the jamb frame. It should remain a consistent 1/8 inch along the top header and down both vertical sides. Place shims behind the strike plate and at the top and bottom corners of the latch jamb until the reveal is uniform. Drive 2-1/2-inch screws through the shims to secure the strike jamb.
Insulating and Air Sealing Without Bowing the Jamb
The cavity between the door jamb and the wall studs requires proper thermal insulation and air sealing.
- Use Low-Expansion Foam Exclusively: Standard expanding spray foam expands aggressively and can exert enough lateral pressure to bow solid wood and composite jambs inward. Always use low-expansion polyurethane foam certified for windows and doors.
- Application Technique: Apply the foam in a continuous, thin bead around the perimeter from the interior side, filling roughly 50% of the cavity depth. The foam will expand to fill the void without distorting the frame.
- Backer Rod and Caulk: For narrower gaps, push closed-cell foam backer rod into the seam and seal the exterior perimeter with premium polyurethane or hybrid polymer sealant.
Proper insulation complements high-performance door materials. For enhanced strength and durability against severe weather, explore our top-rated metal and fiberglass exterior doors.
Threshold Adjustment and the Dollar-Bill Weatherstripping Test
Modern prehung doors feature adjustable threshold sills equipped with adjustment screws across the aluminum cap.
To test the seal:
- Place a dollar bill across the threshold at the bottom corner of the door.
- Close and latch the door.
- Pull the dollar bill straight out. You should feel firm, uniform resistance without tearing the paper.
- Repeat this test at each adjustment screw across the width of the threshold.
- If the bill slides out freely, turn the adjustment screw counter-clockwise to raise the sill cap until proper friction is achieved.
Finally, apply self-adhesive foam corner seal pads at the bottom corners of the side jambs where the weatherstripping meets the threshold to prevent air and light leaks.
Avoiding Costly DIY Mistakes and Structural Pitfalls
Even skilled DIY homeowners can run into issues when installing exterior doors. Watch out for these common installation mistakes:
- Skipping the Sill Pan: Relying solely on caulk along the front of an exterior threshold is a frequent cause of hidden subfloor rot.
- Over-Driving Fasteners: Screwing jambs directly to studs without supporting shims will bow the frame, misalign the latch, and create uneven perimeter gaps.
- Using Standard High-Expansion Spray Foam: Standard foam distorts jambs and prevents the door from closing properly.
- Failing to Anchor the Top Hinge: Relying only on short 3/4-inch factory hinge screws often leads to door sag within a year. Always drive 3-inch screws through the top hinge into the wall stud.
If your existing entryway is experiencing persistent drafts or structural issues, recognizing key signs it is time to replace exterior doors will help you decide when a full upgrade is necessary.
When to Add an Exterior Door with Professional Assistance
While replacing a standard prehung door in an existing wood-framed opening is a practical weekend project, certain conditions call for professional installation:
- Load-Bearing Structural Alterations: Cutting a brand-new opening through structural studs or headers requires load calculations, temporary shoring, and local building permits.
- Masonry and Concrete Cutting: Creating new openings in reinforced concrete block walls (common in Punta Gorda, Sarasota, and Naples) requires commercial concrete saws, structural lintel installation, and specialized bucking.
- Heavy Prehung Units: Premium fiberglass, hurricane impact glass, or solid hardwood units can weigh well over 100 to 150 pounds, making precise manual alignment difficult without specialized equipment.
- Florida Hurricane and Impact Codes: Homes in coastal Southwest Florida must meet stringent wind-load and impact-resistance building codes.
If your installation requires structural alterations or certified impact resistance, you can request a custom exterior door quote from our local team for precise fitting and compliance.
Frequently Asked Questions About Installing an Exterior Door
What is the standard rough opening size for a 32-inch or 36-inch exterior door?
For a standard 32″ x 80″ exterior door, the required rough opening is 34″ to 34-1/2″ wide by 82″ to 82-1/2″ tall.
For a standard 36″ x 80″ exterior door, the recommended rough opening is 38″ to 38-1/2″ wide by 82″ to 82-1/2″ tall.
This sizing provides the necessary 2-inch clearance in width and height to fit the 3/4-inch jambs, threshold assembly, and a 1/2-inch perimeter space for leveling shims and low-expansion foam.
Can I use regular expanding spray foam around a new exterior door frame?
No. You should never use standard high-expansion spray foam around window or door jambs. Standard foam cures with significant expansion force, which can bow wood or composite jambs inward. This deflection causes the door slab to bind, drags against the weatherstripping, and prevents deadbolts from throwing smoothly. Always use low-pressure, low-expansion polyurethane foam specifically labeled for window and door installation.
How do I fix a rough opening that is out of square or unlevel?
If the subfloor sill is unlevel:
- Do not cut the prehung door jambs.
- Place solid composite shims or pour a self-leveling cementitious underlayment across low spots on the subfloor until a 4-foot level reads flat across the base.
If the trimmer studs are out of plumb or square:
- Adjust your shim stacks behind the jambs during installation. Place thicker shims on recessed sides and thinner shims on proud sides to bring the prehung frame into plumb and square, regardless of minor imperfections in the rough framing studs.
Conclusion
Installing a prehung exterior door improves your home’s curb appeal, interior comfort, and overall weather resistance. Taking the time to properly square your rough opening, install a draining sill pan, shim the hinge jambs plumb, and seal the perimeter ensures smooth operation and durable performance for years to come.
Whether you are retrofitting an entryway in Bonita Springs, updating a home in Cape Coral, or completing a major remodel in Sarasota, our team at Evolution Window & Door provides high-performance doors, impact-rated solutions, and professional installation tailored to Southwest Florida homes.


